
In this course you’ll learn the fundamental concepts and skills that will allow you to create three-dimensional models in Blender. We’ll begin with Blender’s interface and navigation tools, and move steadily into the foundational modeling tools like Extrude and Loop Cut. We’ll talk about building up complex objects from basic shapes, and you’ll be introduced to some of Blender’s Modifiers, like Mirror and Subdivision Surface
16 videos, 3hrs 1min
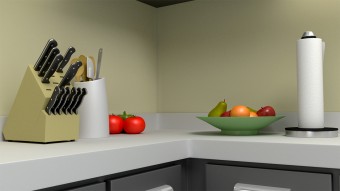
In this course we talk about using Blender’s Cycles render engine to create materials for our objects, light our scenes, and create stunning renders. We first look at Blender’s camera and render settings. We then go over the different kinds of lights that Blender has to offer. And we use the Node Editor to create and modify the materials for our scene. The interaction of materials and lighting is an important part of any scene. This course provides the fundamental concepts and techniques for achieving great renders in Blender.
10 videos, 1hr 30min

In this course we talk about what UV mapping is and why it is needed. We’ll go over the tools that Blender has available for us to UV map our 3D objects. And we’ll look at how to export your UV maps out of Blender so you can build textures in image-editing programs like GIMP. We’ll then bring these textures into Blender and assign them to our objects’ materials using the Node Editor. In addition, we will work with Blender’s Texture Painting tools, and examine how we can paint color and bump textures directly on our 3D models.
15 videos, 1hr 54 mins

UV Mapping is an essential skill for applying textures to 3D objects in Blender 2.8 for animation and games. In this course we will look at what UV Mapping is, why it is needed, as well as the tools and techniques to help you efficiently map your 3D objects in Blender 2.8. We begin the course with an overview of the UV Mapping fundamentals in Blender 2.8. And then we will work on 5 different UV Mapping projects, each of increasing complexity, to help you get comfortable with UV mapping and the workflows involved.
43 videos, 5hrs 51mins
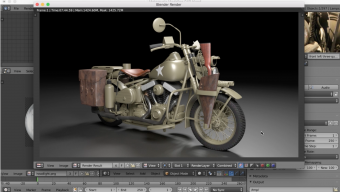
This is a project-based course where we will create Captain America’s motorcycle from the 2011 movie, “Captain America: The First Avenger.” I have taken photographs of the motorcycle at the Harley-Davidson Museum for use as our reference images. You will not only be introduced to new modeling tools, but you will be shown the techniques and strategies needed to tackle a larger modeling project such as this. In the end we will add materials and textures, as well as light and render the iconic motorcycle.
50 videos, 8hrs 23mins

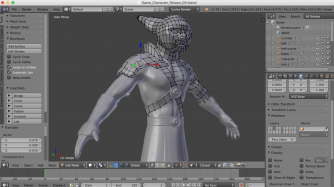
If you’ve ever wanted to create 3D characters for animations or games, then this course is for you. We will create a character for animation using edge modeling techniques. You will learn about creating proper edge-flow so that the character deforms properly during animation.
10 videos, 1hrs 50mins
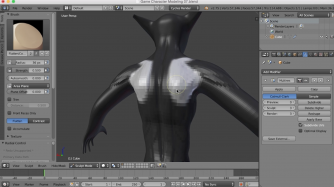
In this course we will create a character using Blender’s sculpting tools. We will first create a base mesh using box modeling techniques, and then we will use Blender’s Multiresolution modifier to create high-resolution detail on the character. In subsequent courses we will bake the detail information to an image map so it can be used into a game engine.
27 videos, 5hrs 14mins
In this course we will use Blender’s Grease Pencil and BSurfaces tools to create a low resolution version of our high-resolution sculpt from the Blender301 course. And we will use the edge-flow ideas from that course as well, while we draw the low-poly topology with the Grease Pencil. We will finish the course by baking a Normal Map from the hi-res sculpt to the low-poly mesh and importing it into the Unity game engine. We will then test the texture map on our character in-game.
10 videos, 1hr 47mins
We look at some of the unique issues regarding UV mapping an organic model like a character. We use Blender’s UV mapping tools to create an organized UV map that can be exported to external paint programs like Photoshop or GIMP for texturing. In addition, we bake normal and ambient occlusion maps to capture the high resolution detail of the original sculpt.
6 videos, 1hr 12mins
In this course we look at Blender’s Texture Painting tools and use them to create texture maps for the goblin character. You’ll learn how to create the fundamental texture maps for your characters: the Color map, Normal map, Ambient Occlusion map, and Specular map. We then bring the character model and the texture maps into the Unity game engine to apply the textures.
13 videos, 2hrs 30mins
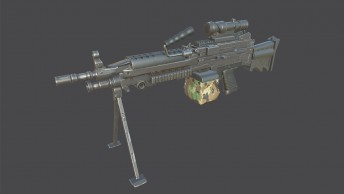
In this course you’ll learn how to use Blender’s modeling tools to create a high resolution model of an M249 Machine Gun. We’ll go over retopology techniques that will allow you to create a low-poly version of the high-poly mesh. You’ll also learn how to create a Color ID map using Blender’s Vertex Paint tools, bake Normal and Ambient Occlusion maps in Blender and in Substance Painter, assign materials in Substance Painter based on a Color ID map, and import your Blender models into Unity so that you can assign the PBR textures created in Substance Painter.
42 videos, 6hrs 30mins
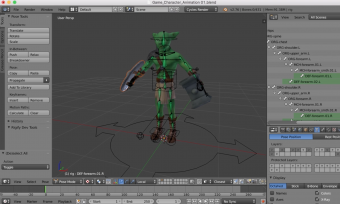
In this course we will use Blender’s Rigify add-on to create a basic rig for a game character. You’ll learn how to prep the character for rigging and generate the base rig using the Rigify add-on. We will then generate the control objects of the rig and go over the various controls and how they would be used during animation. From there we will adjust the weights of the character using Blender’s vertex groups, and parent the character’s war hammer and shield to the rig.
4 videos, 54mins

In this course you’ll learn the basics of creating animation cycles for a game character. We’ll use Blender’s Graph Editor and Dope Sheet to animate Idle and Run animations, as well as create a Jump Pose.
7 videos, 1hr 9mins

Learn to export your Blender game characters to Unity and set-up a character controller to move them around. In this course we will write some C# code in Unity to trigger the run and jump animations in our test level.
5 videos, 53mins
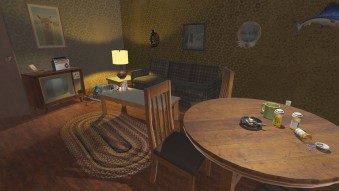
In this course we will use Blender and Unity in an integrated way to create a run-down apartment game environment. We will establish a pipeline process between Blender and Unity and go over different ways of organizing your game projects. You will learn about game modeling, UV mapping, texturing, and lighting as we build the environment. This course will also discuss the use of Adobe Photoshop and Substance Painter when texturing game assets.
33 videos, 7hrs 40mins

These two courses are where it all comes together. We use everything you’ve learned to this point to create an animated scene of a futuristic mech descending into an underground tomb. You’ll begin from scratch as you model the mech character and the environment of the scene. You will then UV map the 3D objects in the scene and use Blender’s sculpting tools to create the sand and stone textures.
37 videos, 5hrs 41mins
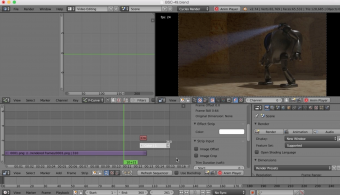
In this, the second part of Animation Production, you will prepare the scene for animation. You will rig the mech character and animate it flying into the tomb and landing. We will use Blender’s Smoke and Fire tools to create thruster flames for the mech’s jet pack. And lastly we will light and render the animation, and export it to a Quicktime file.
32 videos, 5hrs 21mins

In this course you will learn edge modeling techniques in Blender to create a low poly game character. This is the first of several courses that will take you through the entire process of creating a game character with Blender, Substance Painter, and Unity.
30 videos, 4hrs 23mins
In this course we will use the low poly model from Blender450 to build out a high poly version of the character. This is the second of several courses that will take you through the entire process of creating a game character with Blender, Substance Painter, and Unity.
19 videos, 3hrs 3mins

The third part of the Game Character series, this course covers how to UV map our character. This is necessary so that we can apply textures in Substance Painter that can subsequently be used in the Unity game engine. We will go over several different techniques and tools that Blender has to offer when UV mapping.
9 videos, 1hr 13mins

In this course we will go over how to set-up the model in Blender so that we can efficiently texture the character in Substance Painter. You will learn about how using multiple objects, Blender materials, and Vertex Colors can help us organize the model in Substance Painter and make our lives easier when texturing and baking textures for a game engine. And we will go over procedural texturing in Substance Painter.
13 videos, 1hr 54mins
In this course we will rig our character based on what Unity needs to set-up its Humanoid Rig system. If we can fulfill the requirements of the Humanoid rig then it opens up the possibility for using hundreds of animations available for free and for purchase on the Unity Asset store.
In the end, we will bring our character and textures into Unity and set it up so that we can use the animations that come free with Unity’s Standard Assets.
11 videos, 1hr 21mins

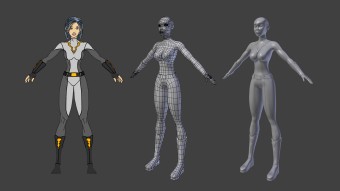
In this course you will create a 3D character for games and animation, from the first polygon to the final rigged character. This course uses only open-source software, Blender and Krita, to create a character that is ready for character animation in Blender, as well as for import into any 3D game engine, like Unity and Unreal.
48 videos, 8 hours 20mins

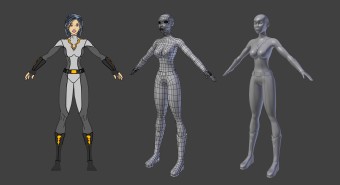
In this course you will create a 3D character for games and animation, from the first polygon to the final rigged character. This course uses only open-source software, Blender and Krita, to create a character that is ready for character animation in Blender, as well as for import into any 3D game engine, like Unity and Unreal.
43 videos, 6 hours 40 mins

In this course you’ll use Blender 2.8 to model the character’s face with proper edge flow, so it will animate believably. You’ll learn how to create hands and feet, as well as the character’s space suit and helmet. We’ll use the Blender 2.8 sculpting tools to create the wrinkles and folds of the space suit. Then you will learn how to bake a normal map to capture the high resolution detail, and apply it to a lower poly version.
46 videos

When the character has been modeled and textured, we will then turn our attention to rigging. You’ll learn how to create the underlying skeleton, or armature, that will control the character. And we will pose the character in the scene. We will then go over how to create lights and a turntable animation.
48 videos
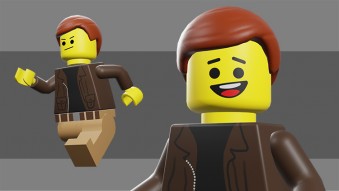
We’ll use Blender 2.8 to build a Lego character. And then you’ll learn how to UV map the entire character. We will use Blender’s texture painting tools to create the clothes of the character, and we’ll use the sculpt tools to create the high res details of the hair. Next, we’ll work on rigging the character and create the rig manually, so you can see how a character rig is built from the ground up. We will use Blender 2.8’s new Grease Pencil tools to animate both a 2D drawn face and a 3D body at the same time. You will then learn how to export the character, animations, and textures out of Blender and bring them into the Unity game engine.
56 videos, 9 hours